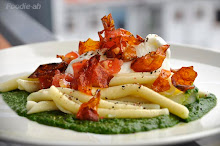
This time I decided to prepare a quick and simple tomato sauce, and invest more time on the actual pasta. Since we are on the topic, many believe that homemade pasta is always better than dried pasta. It is actually not how we see it in Italy. The choice of pasta depends on the sauce that you pair with it. Certain sauces go well with fresh pasta, while others would only really work with dried pasta. Bacon and tomato sauce is a classic example that pairs perfectly with fresh pasta, especially when it is riveted or hollow, so that the tasty sauce sticks particularly well. It is very easy to make and can hardly go wrong!

This time I decided to experiment a bit with my digital camera, so I shot a video of the key parts of the preparation process. Hopefully this helps!
The ingredients for the fresh Garganelli are:
- 200gr plain flour (2-4 people)
- 3 eggs
- a pinch of salt
- some olive oil
The ingredients for the sauce:
- Some chopped bacon, preferably smoked
- Chopped onions
- Some red wine
- Finely chopped garlic
- Finely chopped carrots
- Some drained tinned plum tomatoes (drain them from their juice for at least 1 hour)
- Oregano or basil to taste
- Chilli (optional)
- Pecorino cheese (optional)

For the fresh pasta, please follow the instructions as shown on the video. Depending on the size of the eggs, you will need to add additional egg white should the consistency be too hard and dry for kneading comfortably. When the dough is smooth, wrap it in cling film and let it rest in the fridge for at least 1 hour. In the meantime, start preparing the sauce.
Chop bacon, garlic, onions and carrots. On a frying pan, bring some olive oil to the heat and fry the bacon until golden. Remove it, then fry the onions and garlic for a couple of minutes and add the carrots. Continue to fry until soft and well browned, then remove from the pan. Deglaze the pan on high heat with a glass of red wine and reduce to a half. Then add the bacon back into the pan, followed by the chopped onions and carrots. When bubbling, add the plum tomatoes and rapidly chop them while tossing. Add the herbs and salt as necessary, then slowly continue to cook over very low heat.

Remove the dough from the fridge, and bit by bit flatten into sheets. Once a sheet is flattened, cut it into 3x3cm squares, and roll around a chopstick. Gently press and roll the ends of the chopstick onto a sushi bamboo mat to rivet the Garganelli, then place each piece aside. Do not overlap pieces on top of each other, or they will flatten.

In the meantime, the sauce should be ready. Add some water or milk if you need to prolong the cooking time and it gets too dry. Grate some Pecorino cheese, remove the sauce from the heat and mix it into it. Cover and let it rest.
Boil some water in a large saucepan, salt it and put the Garganelli into it. Let them cook for less than 2 minutes, then drain and mix them into an appropriate amount of sauce. Plate and serve hot.


 I have never actually cooked rhubarb before, so this would be my first experience with it. I quickly did some research to find a recipe, and I found this one: 45 minutes at 61C.
 As in the recipe, I mixed some natural vanilla pods, about 130g rhubarb and 25g of sugar in a bag and vacuumed it dry. I only cooked it for 30 minutes, since this other recipe suggests cooking it at the same temperature for just 20 minutes, so I decided to average them out.
 The result was very tasty, especially with that natural and smooth vanilla flavour lingering in the background. Next time, I would try to cook it for 45 minutes, since I could tell that it would have tasted even better if softened a bit further.

 I used pork belly on the bone, and I brined it for a couple of hours in a solution of 1l of water, 80gr salt and 30gr of sugar. It would have been better to brine it overnight, but I didn't have the time and I decided to take that shortcut this time. At least next time, when I will be doing it the proper way, I will know the difference. After brining the pork, I quickly washed and vacuum packed it together with a "herb sachet" containing black peppercorns and thyme.
 Finally, I slow-cooked the pork at 180F (82.2C) for 12 hours, then removed it from the water bath, chilled it and refrigerated. At the time of serving, I opened the pack and set aside the gelatin surrounding the meat (this forms during the slow cooking process followed by refrigeration). I removed the skin from each piece of belly and crisped it on a non-stick pan, skin side down (no added oil necessary) on high-heat. At the same time, on a normal stick metal pan, I browned each piece of pork on a thin film of canola oil. Once browned, I removed the pork and deglazed with a splash of Marsala wine (the Italian touch that does magic with pork!), and once the alcohol evaporated I added the gelatin and another 40ml of chicken stock. I reduced the sauce over 4-5 minutes, then served it with the pork bellies, topped with their own crispy skin.
 Ingredients: