I blogged in the past about
Mozza, the new pizza phenomenon. I love their pizza with that phenomenal crunchy crust, despite it's not Italian pizza. There are endless debates such as
this one, on whether Mozza's product is actually pizza. I think this is pretty simple to clarify: Mozza is Mozza pizza. It is not Neapolitan pizza, and it's not Pizza Hut either. Even in Italy, we have different styles of pizza, which are quite apart from Neapolitan pizza, but we still call them pizza.

Getting to the more meaty part of the story, I like the dough that
Nancy Silverton has created. Without a doubt, she has come up with an innovative, unique crust.
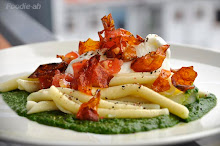
Mario Batali, on the other hand, has complemented that with some American-Italian toppings. My favourite of all is the one with slow roasted tomatoes and burrata cheese, which I made replacing burrata with ricotta (se picture above) due to unavailability of burrata.

As into bread making as I am, it is only logical that I wanted to try to reproduce this delicacy, and so I did. The real problem was that a proper recipe cannot be found. After searching through the net multiple times, I came to the conclusion that there is only one recipe published (2 posts with the same recipe:
Pizza School, and
Scuola di pizza), and it just doesn't work. I tried that recipe and it was nowhere near what you would have at Mozza. So I did further research, and watched numerous
videos by Peter Reinhart on the quest for the perfect pizza. About 3 or 4 of them are dedicated to Mozza, and although there is no mentioning of the recipe which is of course a very well protected secret, I worked it out myself by combining bits of information from the Mozza pizza school, and the process used by the factory to produce Mozza's dough.

I must say that the end result is closer than I imagined I could get to, factoring in the fact that we use different flour. My recipe isn't the most simple and it takes some time to execute, but then again if you want a perfect result, you have to go through the pain!
This dough contains a small amount of rye flour and wheat germ, which contribute to its distinct taste.

The following doses will produce 3 crusts:
POOLISH:
- 125g Bread Flour (in Singapore, I used Prima bread flour)
- 125ml Water
- 1 tiny pinch of dried yeast (about 0.5 grams)
FINAL DOUGH:
- 250g bread flour
- 150ml Water
- 3g Brown rye flour
- 3g Wheat Germ (this can be found in organic products shops)
- 7g Kosher salt
Start with making a poolish (
pre-ferment) by combining the bread flour, water and dried yeast. Once well incorporated (mixing the ingredients for a minute or so should suffice), cover the bowl with cling film, tighten it with a rubber band, and let it rest at 15C for about 12-16 hours. You will know when the ferment is ready once you see lots of bubbles on the surface. It will be over-ripened if you will notice signs of the dough receding within the bowl. I kept my dough in a wine cellar, which maintained a constant temperature. Depending on the amount of yeast and environment temperature, your poolish might take longer or shorter to mature, so you will need to check it until you can tell it's ready, and before it over-ripens.

In a bowl, mix 150ml water together with all the flours, but do not add the salt. Once roughly combined, incorporate the poolish into the mixture, and knead using a dough mixer until gluten is almost fully developed. Then add the salt, dissolved into a very small amount of water (10ml will be sufficient) and continue to mix until you reach full gluten development. Use the
windowpane technique to check.
Once completed, pull the dough out of the mixer and place it into a bowl. Let it rest for 15 -30 minutes, and it will be ready for shaping. Divide it into three chunks, and shape each one by dusting it into a very small amount of flour (just as much as you need for it not to stick to your fingers), and shape it into a ball by pulling the sides and folding them underneath it then pushing them into it. This operation must be repeated 5-6 times, and it is important to trap bubbles of air into your dough ball, so that you will get a nicely bloated crust once you bake your pizza.

Put the dough balls into a container and tightly seal to prevent air from drying the surface. Place the dough balls in a cold area of your refrigerator and let them rest overnight. 12 to 24 hours later, pull the dough balls out of the fridge and let them rest outside for about 1 to 2 hours. Now they are ready for use. Shape them into a pizza by following the technique shown in this
Mozza video. I recommend you finally place the stretched pizza on baking paper and put it into the oven with the paper, or else you will be likely to mess it up unless you have the right tools. In the video below, I filmed the shaping part and the condiment technique for the fennel and spring onions pizza. My video might help you see how this recipe's dough is supposed to behave during the stretching phase.
When it comes to the topping, needless to say that the combinations are unlimited. I made the first one with one of the Mozza classic toppings: cream, onions and spring onions, fennel, and mozzarella (I omitted the sausage as I didn't have one handy).

The second was my favourite Mozza's topping, the slow roasted tomatoes and burrata one. I roasted the tomatoes for about 6 hours at 90C with some salt, thyme and oregano sprinkled on top.

I prepared a base tomato sauce to dress the pizza so that the slow roasted tomatoes could be placed on top of it. To prepare the sauce, I heated some olive oil, added a tin of chopped Italian tomatoes, then cooked them for about 5 minutes with some salt, pepper and fresh basil.

Finally, the cooking stage. The huge advantage of Mozza's pizza is that, unlike the classic Neapolitan pizza, it doesn't require an incredibly hot oven, and works well with longer cooking times. If your oven can reach about 250C, then you can cook this. Of course, you must have a refractive stone in order to have a crispy bottom like the one below (I purchased a lava stone from
Hup Kiong cut to exactly the size of my oven, and it works wonders). Make sure that the stone is fully heated, and that will take at least 30 minutes of pre-heating at maximum temperature before you insert the pizza.

Now it's time to sit in front of your oven and watch the crust slowly blow and brown until ready!


 For this recipe, I used the following ingredients:
 Cooking process:
 I transferred the parcel onto a plate, opened up the foil and served the whole fish at the table portioning chunks of flesh and a few of the herbs and lemon slices for decoration, for the enjoyment of the family!
 Pain a l'ancienne is perhaps my favourite bread I have produced so far. I love its colour, texture and flavour. The golden brown cracking crust, the white airy crumb, the sweetness that is released as you chew it. I like having this straight out of the oven (after a 15 minutes resting period), soaked in quality olive oil. It doesn't need much more to keep you eating it!
 I would like to share my recipe, which is a mix of the baguette recipe I found in
  Two days in advance (I usually start Friday night for bread that I bake on Sunday morning), mix the flour and water (in which you will dissolve the yeast first) for the poolish in a small plastic container that you can hermetically seal. Also, mix the flour and water for the main dough (244g flour and 120ml water), knead until fully incorporated, shape into a ball, wrap it in cling film, and store in a separate tightly sealed plastic container. Put both containers it in a wine cellar at about 12-14C, and let ferment for about 18-24 hours. The poolish should look very bubbly and airy through the plastic container.
 The next evening:
 The next morning, take the box out of the cellar 60 minutes in advance, and switch on the oven at 270C. I highly recommend you have a baking stone (I purchased a lava stone from
  This is my recipe:
 Now the dough is ready for stretching. Remove the cling film, pat some flour around the dough and flatten it by pushing it with your fingers, until you obtain a flat "pizza" like shape. Do not stretch it or pull it at this point. Now lift the dough, and let it stretch naturally with its own weight, supporting it with your fists (like in the picture above). Keep stretching it, until you lave a large section in the middle that is paper-thin and transparent.
 Now the sheet is ready for laying on the tray. I used a non-stick pizza tray I bought in Cold Storage.
 Slowly fit it onto the tray, then cut the crescenza cheese into small pieces and scatter them around the perimeter and in the middle. I used about 100gr of crescenza for each focaccia. Repeat the same stretching exercise on a second piece of dough, then lay it on top of the other, and make the two stick around the edges.
 Finally, with the help of a rolling pin, cut the focaccia around the edges, and recollect the residual dough into a ball. It can be reused after resting for 2-3 hours in cling film to prevent it from drying out.
 I tried this recipes a couple of times, and although the first attempt was already pretty good, it got better and better. At my third attempt, it came out so well that it was devoured in no time by my guests. In a way, it put the rest of the meal to shy :(
 I decided to make 2 different fougasses, one with anchovies and capers, and one with sun dried tomatoes. Following, the recipe I used, which I derived from the great book
  Ingredients for the Pâte Frementée:
 Ingredients for the main dough:


 Making focaccia Genovese is a bit involving, since it requires the dough to raise 4 times and you MUST stick to the given timings, so you must be around it and you can't "leave and forget it". On the other hand, the result is amazing and well worth a try!
 Put the water, the malt, olive oil, salt and half of the flour into a large bowl. Kneed it well until homogeneous. Completely dissolve the yeast into a bit of water (temperature @ 30C), then pour it into the dough, and kneed until fully incorporated. Then proceed with the rest of the flour and kneed until the dough is smooth and not excessively sticky. Cover the bowl and let the dough rest for about 15 minutes at room temperature (about 30C).
 Fold the dough twice by slightly stretching it and then folding the two sides into the middle, once in each direction, first horizontally, then vertically. This is to strengthen it. You should end up with the dough shaped more or less rectangular as your oven tray (although smaller in size)
 Press the dough with your hands onto the tray, flattening it until it covers the whole tray. You should try not to stretch it in order to maintain a regular thickness throughout. You might find that it's quite elastic and that it needs a little bit of work to stabilise and cover the entire tray. Sprinkle abundant salt on top to give flavour to the focaccia and also to prevent the formation of a dried crust. Let the dough rest a 3rd time, for about 30 minutes.
 Now it's time to make the classic depressions into the focaccia. Cover the dough with a few tablespoons of tepid water and some olive oil, then with your palms, massage the liquid on top of the dough to mix it and spread it uniformly. Now, with your fingers push into the dough with energy top to bottom, forming depressions as in the picture above. The oil and water should sink into the depressions, forming softer areas that will create the interesting different textures that are typical of focaccia Genovese.
 Let the focaccia raise a 4th time, for about 60-75 minutes. Now it's finally ready for cooking. Put the tray into the oven at about 220-240C for 15-20 minutes. Remove from the oven, lift from the tray and let it slide onto a grate, or any surface that will let the focaccia breathe underneath. This is because if you keep it in close contact with the tray, the steam from underneath will make the base soggy instead of evaporating.
 Let the focaccia rest for a couple of minutes, brush with some olive oil on top, slice and serve while still warm. The crust should be salty and crispy, while the inside must be soft and porous.