
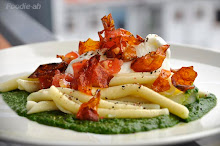
 Getting to the more meaty part of the story, I like the dough that Nancy Silverton has created. Without a doubt, she has come up with an innovative, unique crust. Mario Batali, on the other hand, has complemented that with some American-Italian toppings. My favourite of all is the one with slow roasted tomatoes and burrata cheese, which I made replacing burrata with ricotta (se picture above) due to unavailability of burrata.
 As into bread making as I am, it is only logical that I wanted to try to reproduce this delicacy, and so I did. The real problem was that a proper recipe cannot be found. After searching through the net multiple times, I came to the conclusion that there is only one recipe published (2 posts with the same recipe: Pizza School, and Scuola di pizza), and it just doesn't work. I tried that recipe and it was nowhere near what you would have at Mozza. So I did further research, and watched numerous videos by Peter Reinhart on the quest for the perfect pizza. About 3 or 4 of them are dedicated to Mozza, and although there is no mentioning of the recipe which is of course a very well protected secret, I worked it out myself by combining bits of information from the Mozza pizza school, and the process used by the factory to produce Mozza's dough.
This dough contains a small amount of rye flour and wheat germ, which contribute to its distinct taste.

The following doses will produce 3 crusts:
POOLISH:
- 125g Bread Flour (in Singapore, I used Prima bread flour)
- 125ml Water
- 1 tiny pinch of dried yeast (about 0.5 grams)
- 250g bread flour
- 150ml Water
- 3g Brown rye flour
- 3g Wheat Germ (this can be found in organic products shops)
- 7g Kosher salt
 In a bowl, mix 150ml water together with all the flours, but do not add the salt. Once roughly combined, incorporate the poolish into the mixture, and knead using a dough mixer until gluten is almost fully developed. Then add the salt, dissolved into a very small amount of water (10ml will be sufficient) and continue to mix until you reach full gluten development. Use the windowpane technique to check.
Once completed, pull the dough out of the mixer and place it into a bowl. Let it rest for 15 -30 minutes, and it will be ready for shaping. Divide it into three chunks, and shape each one by dusting it into a very small amount of flour (just as much as you need for it not to stick to your fingers), and shape it into a ball by pulling the sides and folding them underneath it then pushing them into it. This operation must be repeated 5-6 times, and it is important to trap bubbles of air into your dough ball, so that you will get a nicely bloated crust once you bake your pizza.
 Put the dough balls into a container and tightly seal to prevent air from drying the surface. Place the dough balls in a cold area of your refrigerator and let them rest overnight. 12 to 24 hours later, pull the dough balls out of the fridge and let them rest outside for about 1 to 2 hours. Now they are ready for use. Shape them into a pizza by following the technique shown in this Mozza video. I recommend you finally place the stretched pizza on baking paper and put it into the oven with the paper, or else you will be likely to mess it up unless you have the right tools. In the video below, I filmed the shaping part and the condiment technique for the fennel and spring onions pizza. My video might help you see how this recipe's dough is supposed to behave during the stretching phase.
When it comes to the topping, needless to say that the combinations are unlimited. I made the first one with one of the Mozza classic toppings: cream, onions and spring onions, fennel, and mozzarella (I omitted the sausage as I didn't have one handy).
 The second was my favourite Mozza's topping, the slow roasted tomatoes and burrata one. I roasted the tomatoes for about 6 hours at 90C with some salt, thyme and oregano sprinkled on top.
 I prepared a base tomato sauce to dress the pizza so that the slow roasted tomatoes could be placed on top of it. To prepare the sauce, I heated some olive oil, added a tin of chopped Italian tomatoes, then cooked them for about 5 minutes with some salt, pepper and fresh basil.
 Finally, the cooking stage. The huge advantage of Mozza's pizza is that, unlike the classic Neapolitan pizza, it doesn't require an incredibly hot oven, and works well with longer cooking times. If your oven can reach about 250C, then you can cook this. Of course, you must have a refractive stone in order to have a crispy bottom like the one below (I purchased a lava stone from Hup Kiong cut to exactly the size of my oven, and it works wonders). Make sure that the stone is fully heated, and that will take at least 30 minutes of pre-heating at maximum temperature before you insert the pizza.
Now it's time to sit in front of your oven and watch the crust slowly blow and brown until ready!


18 comments:
Commendable effort and work. I'm so impressed by your drive and great results. Now I'm afraid my macarons will not match up. Heehe
hi there, just wanna ask how you pick out a good pizza stone and how do i go about ordering one. i'll try out hup kiong as mentioned but i'm not sure how to go about it. appreciate the help...
M - thanks! And your macarons look perfect!
Lennyboy - go to the shop (I went to the one in Balestier) and ask for a lava stone tile. These tiles are dark grey and very porous, and they are the only ones that can be used for cooking as they are not treated. You might want to do like me and take the measurement of the width of your oven trays, then ask them to cut the stone to that width. The depth is always 30cm, as that's a fixed size. I am not sure if this is the sort of information you were looking for, but if not, feel free to ask!
Lennyboy - Also, my friend from http://pavechocolates.wordpress.com says: "I got the ones for our oven at http://www.polystone.com.sg/ They are brilliant in keeping the heat in and for baking bread. If you go to Polystone, it will be cheap if they have offcuts that fit your size, or else, it will be a bit more expensive. Tell the auntie you are using it for your oven and she will know. She sells a lot to pizza restaurants as well as those hot stone restaurant places."
your pizza looks great and I'd have to agree that the pizza dough from Mozza is really something!
Hi Amiscell,
Does the dough come out very tacky? With a 74% hydration, the formula matches a ciabatta. I had a difficult time shaping it, but I can imagine that the crust will be great if it turns out.
LT - no pizza dough is easy to handle :) but ciabatta is higher in hydration. When did you have difficulties? At the shaping time, or the stretching time? Lightly flour it to prevent it from sticking, but the trick is to flour it "just enough". You should be able to see how it feels in the video I posted.
Hi Dear!
I would like to asky couple of tecnical questions before I tray to make this recipe:
- How long you mix in the mixer before to eachive, what you call windowpane stage?
- Which speed you use when you mix the dough?
(slow/medium/faast/)
- How strong is your flour PRIMA?
(Flaour "Forza" 390 - 410?)
Thank you for sharing your secret and amazing trials.
Kindest
Dear Barone,
Unfortunately, there is no answer to your questions since as always with bread making, there are too many variables such as the type of dough mixer and hook you use, flour, humidity etc.... So in lack of experience, the only way to know when the gluten is fully developed is to use the windowpane testing technique. There are plenty of videos on youtube that train you on how to do it, but essentially you can tell when the dough becomes smooth and silky to the touch. This is the most important step of all, and if you don't get it right, you won't even be able to stretch your pizza properly. As per the flour strength, I don't know as Prima don't publish this data on their flours. However, it really doesn't matter much, so long as you use high protein flour. Last time I made this, I mixed 50-50 Prima and Manitoba flours (which is even stronger) and I got the same results.
Did you put more yeast in the dough other than the small amount in the POOLISH?
Anonymous - I have done it without adding it, although I have sometimes experienced very slow raising times. More recently, I have been adding 1/2 grams of yeast to the final mixture to guarantee fermentation. I recommend this, especially if the ambient temperature is low (in Singapore is always 30C).
hello, how long does the crispyness of the dough lasts? does it become chewy when you leave it on the table after an hour?
Anonymous - The best pizza is meant to be baked and eaten straight away. Any natural bread will lose crispiness when left out for some time. The speed at which this happens does not depend on the recipe (unless you add chemicals compounds to it), rather on the humidity of the environment, which happens to be very high in Singapore.
thank you very much for the info! more power to you
Beautiful pizza crust and roasted tomato! So hungry just looking at your post.. i must try out this amazing recipe soon. Thanks for sharing
Hi, I was using your recipe to make the pizza dough. At the stage where we need to mix everything together, I was kneading it using a dough hook on a kenwood mixer at low speed for more than 15 mins but still can't get the dough to come together. Not sure how long did you knead the dough for? Should I add more yeast to the final dough as I think the gluten is forming very slowly. Thanks.
Hi Tim,
Have you tried at higher speed? I used to knead for about 15 mins or so, maybe slightly longer.
Another way that will make things easier for you is to use the "no knead" technique. Mix all the ingredients with a spatula by hand, put them into an air-tight plastic container, and store it into the fridge for 2-3 days. Then get it out, portion it into dough balls, rest them overnight, and you have your Mozza dough!
The third approach is to do as you did, and leave the dough "less developed" but then store it in the fridge as described above for a whole day before portioning into balls. That day of gluten development should suffice.
I visted Mozza in LA last year and thought it was the best pizza I have ever eaten. I tried your recipe some time ago but did not get the same results so am going to try again and pay more attention to the window pane. Question: When shaping the dough balls, you said to repeat 5-6 times. I am not sure what you meant by the repeat.
Post a Comment